Overview
This Documentation includes guides, tutorials and references for you to build your own Bkper Agents and integrations.
Under constant evolution, you can keep up with new releases and deprecations on our changelog and check for the platform status at anytime.
Bkper Agents Model
Agents on Bkper represent any application that can perform actions on books, on behalf of the user.
These agents can take various forms such as Apps, Bots, Assistants, or even Banks that interact with the Bkper platform:

Take a look at this table, from Google Cloud documentation:
Bot |
AI Assistant |
AI Agent |
|
|---|---|---|---|
Purpose |
Automating simple tasks or conversations |
Assisting users with tasks |
Autonomously and proactively perform tasks |
Capabilities |
Follows pre-defined rules; limited learning; basic interactions |
Responds to requests or prompts; provides information and completes simple tasks; can recommend actions but the user makes decisions |
Can perform complex, multi-step actions; learns and adapts; can make decisions independently |
Interaction |
Reactive; responds to triggers or commands |
Reactive; responds to user requests |
Proactive; goal-oriented |
Source: Google Cloud Docs
Agents can only access books that have been explicitly shared with the user they’re acting on behalf of, creating a permission model that maintains data security.
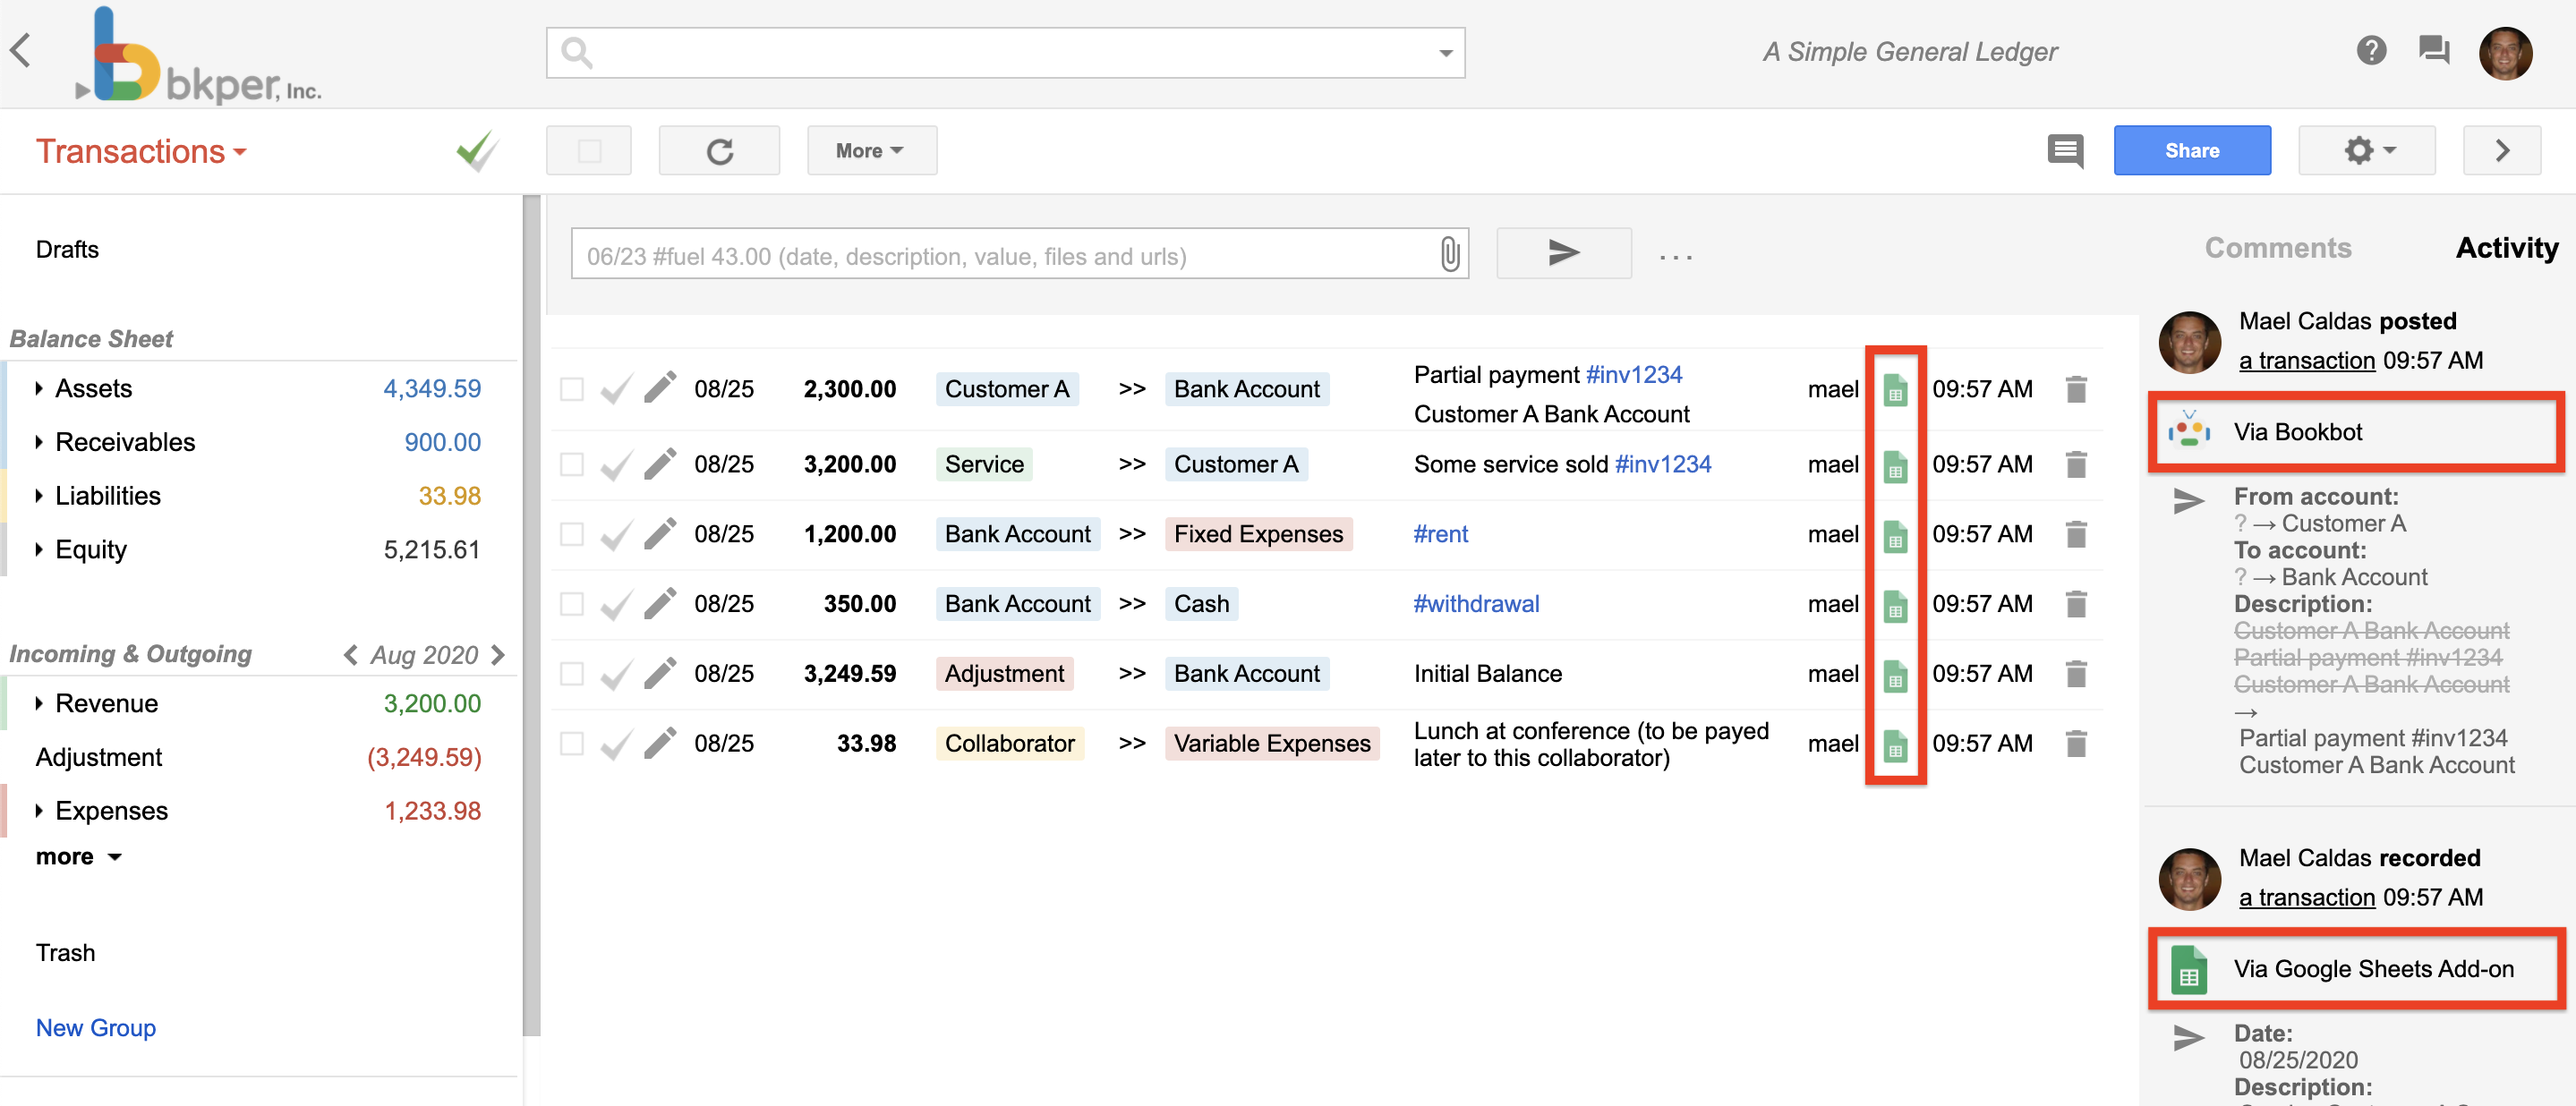
Their activities and transactions clearly identified by their unique logo and name throughout the Bkper interface, making it easy to track which entity performed specific actions:
The App agent is identified by the API Key when calling the API.
Apps
Apps can be as simple as opening a url in the book’s context or as complex as a complete Add-on with business logics.
They are interactive solutions that can run independently and integrate to third party solutions.
Listing
All Bkper Apps are listed on the Automations Portal accessed at app.bkper.com > Automations > Apps menu.
Each App has its own page, logo, site and additional details, like bellow:
The App listing and settings are managed using the Bkper bkper-node utility.
Context Menu
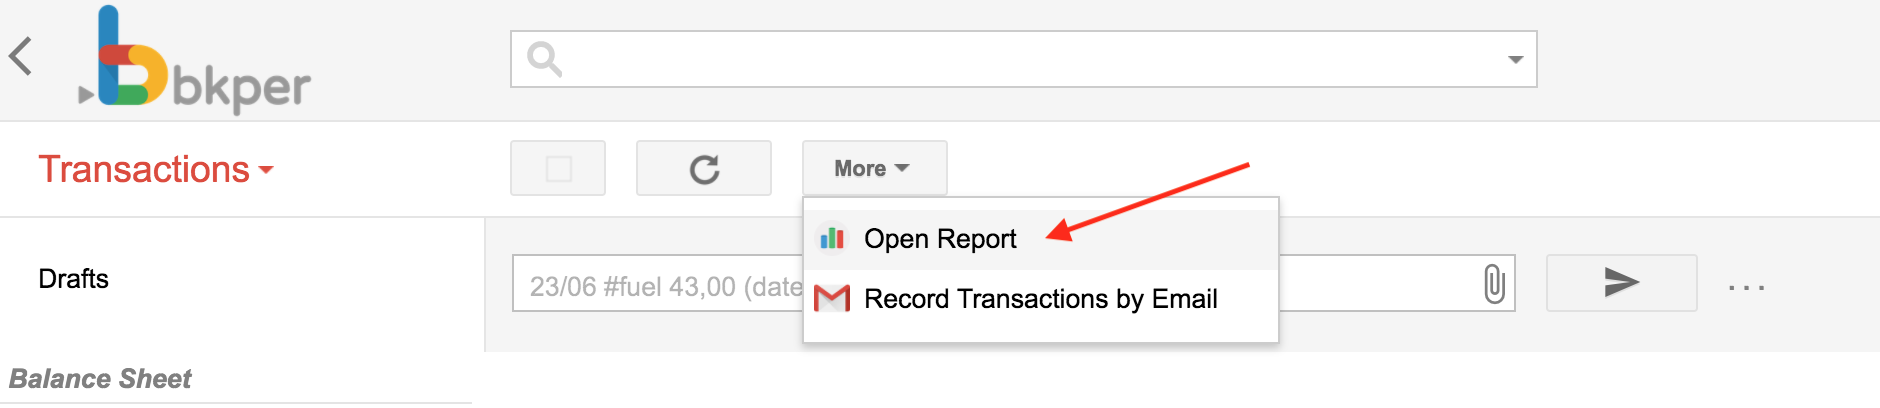
Apps can add context menus items on the Transactions page More menu in your Books. This allows for you, to open dynamically build urls with reference to expressions of a Book’s context.
Once you install an App with a menu configurations, a new menu item will appear in your Book:
The popup that opens carries the particular context of that book at that moment:
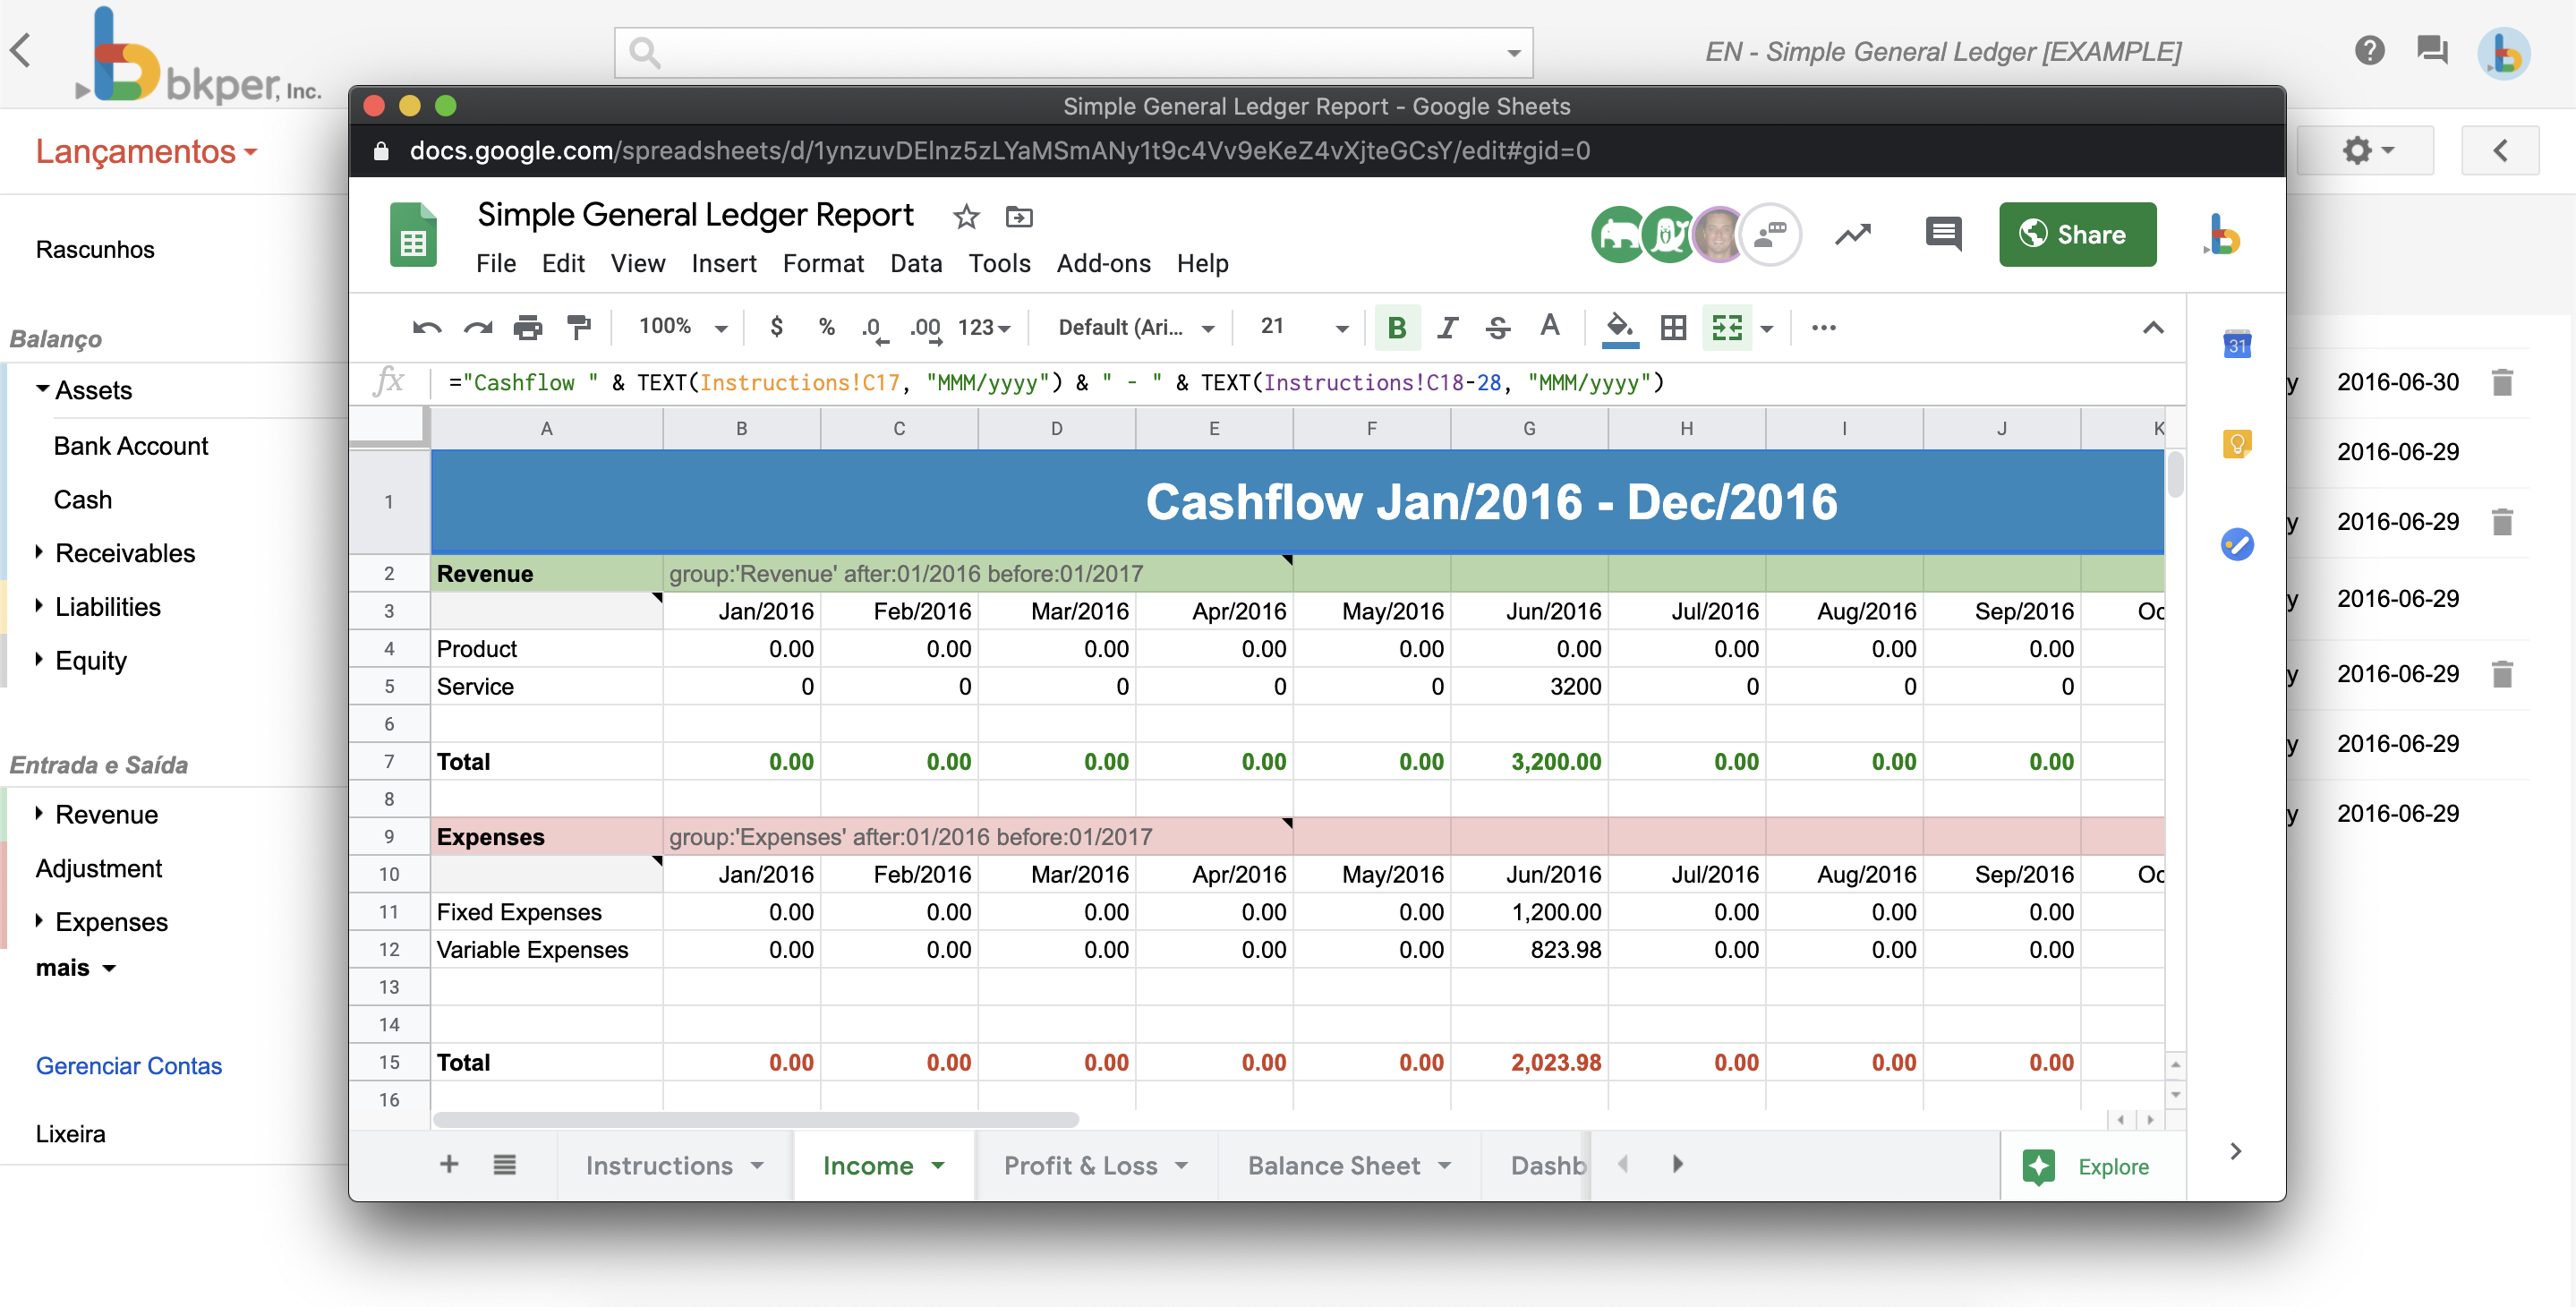
On selecting the new option from the more menu the url can be composed dynamically, by replacing expressions ${xxxx} with contextual information of the Book. Example:
menuUrl: https://my.link.com/bookId=${book.id}&query=${query}
Once user click the More menu button, the menu url will become:
https://my.link.com/bookId=xxx&query=yyy
Where xxx is the current Book id and yyy is the current query being executed.
For reference of the accepted expressions see bkperapp.yaml.
Creating a new App
Apps are created and updated by the rest API, using the bkper-node utility and library package.
Bots
Bots are a specialized kind of App that react to events from your Books.

A Bkper Bot can, for example, calculate taxes on transaction posting, convert currencies on transaction checked or post a message to Slack on comment created.
Bot agents
Bots run on behalf of the user who installed it, and the agents are identified in the transactions and activities list:
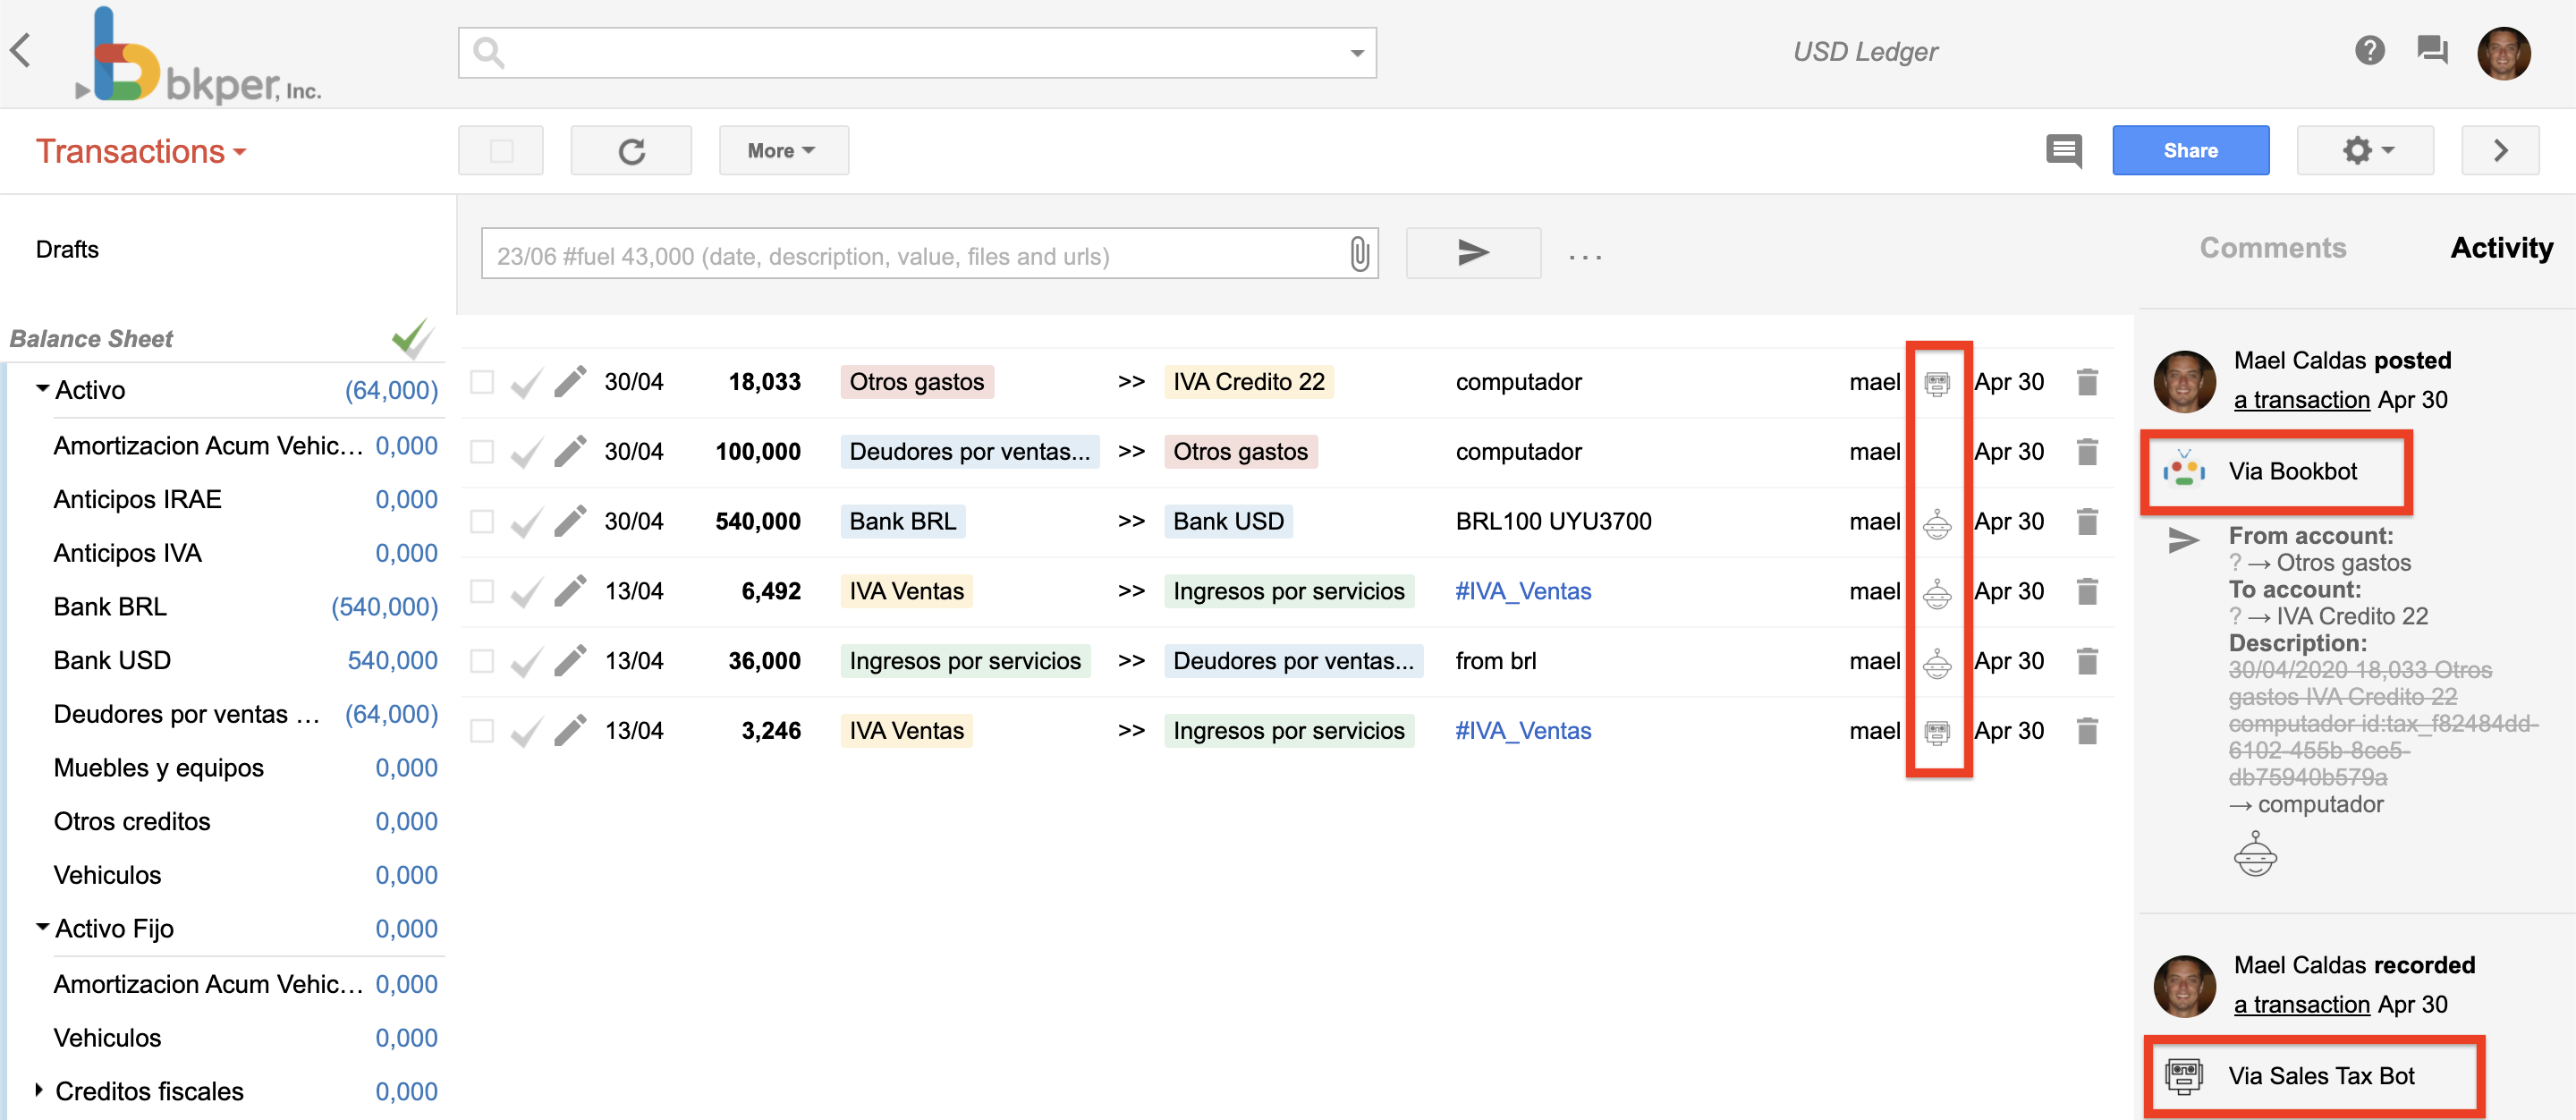
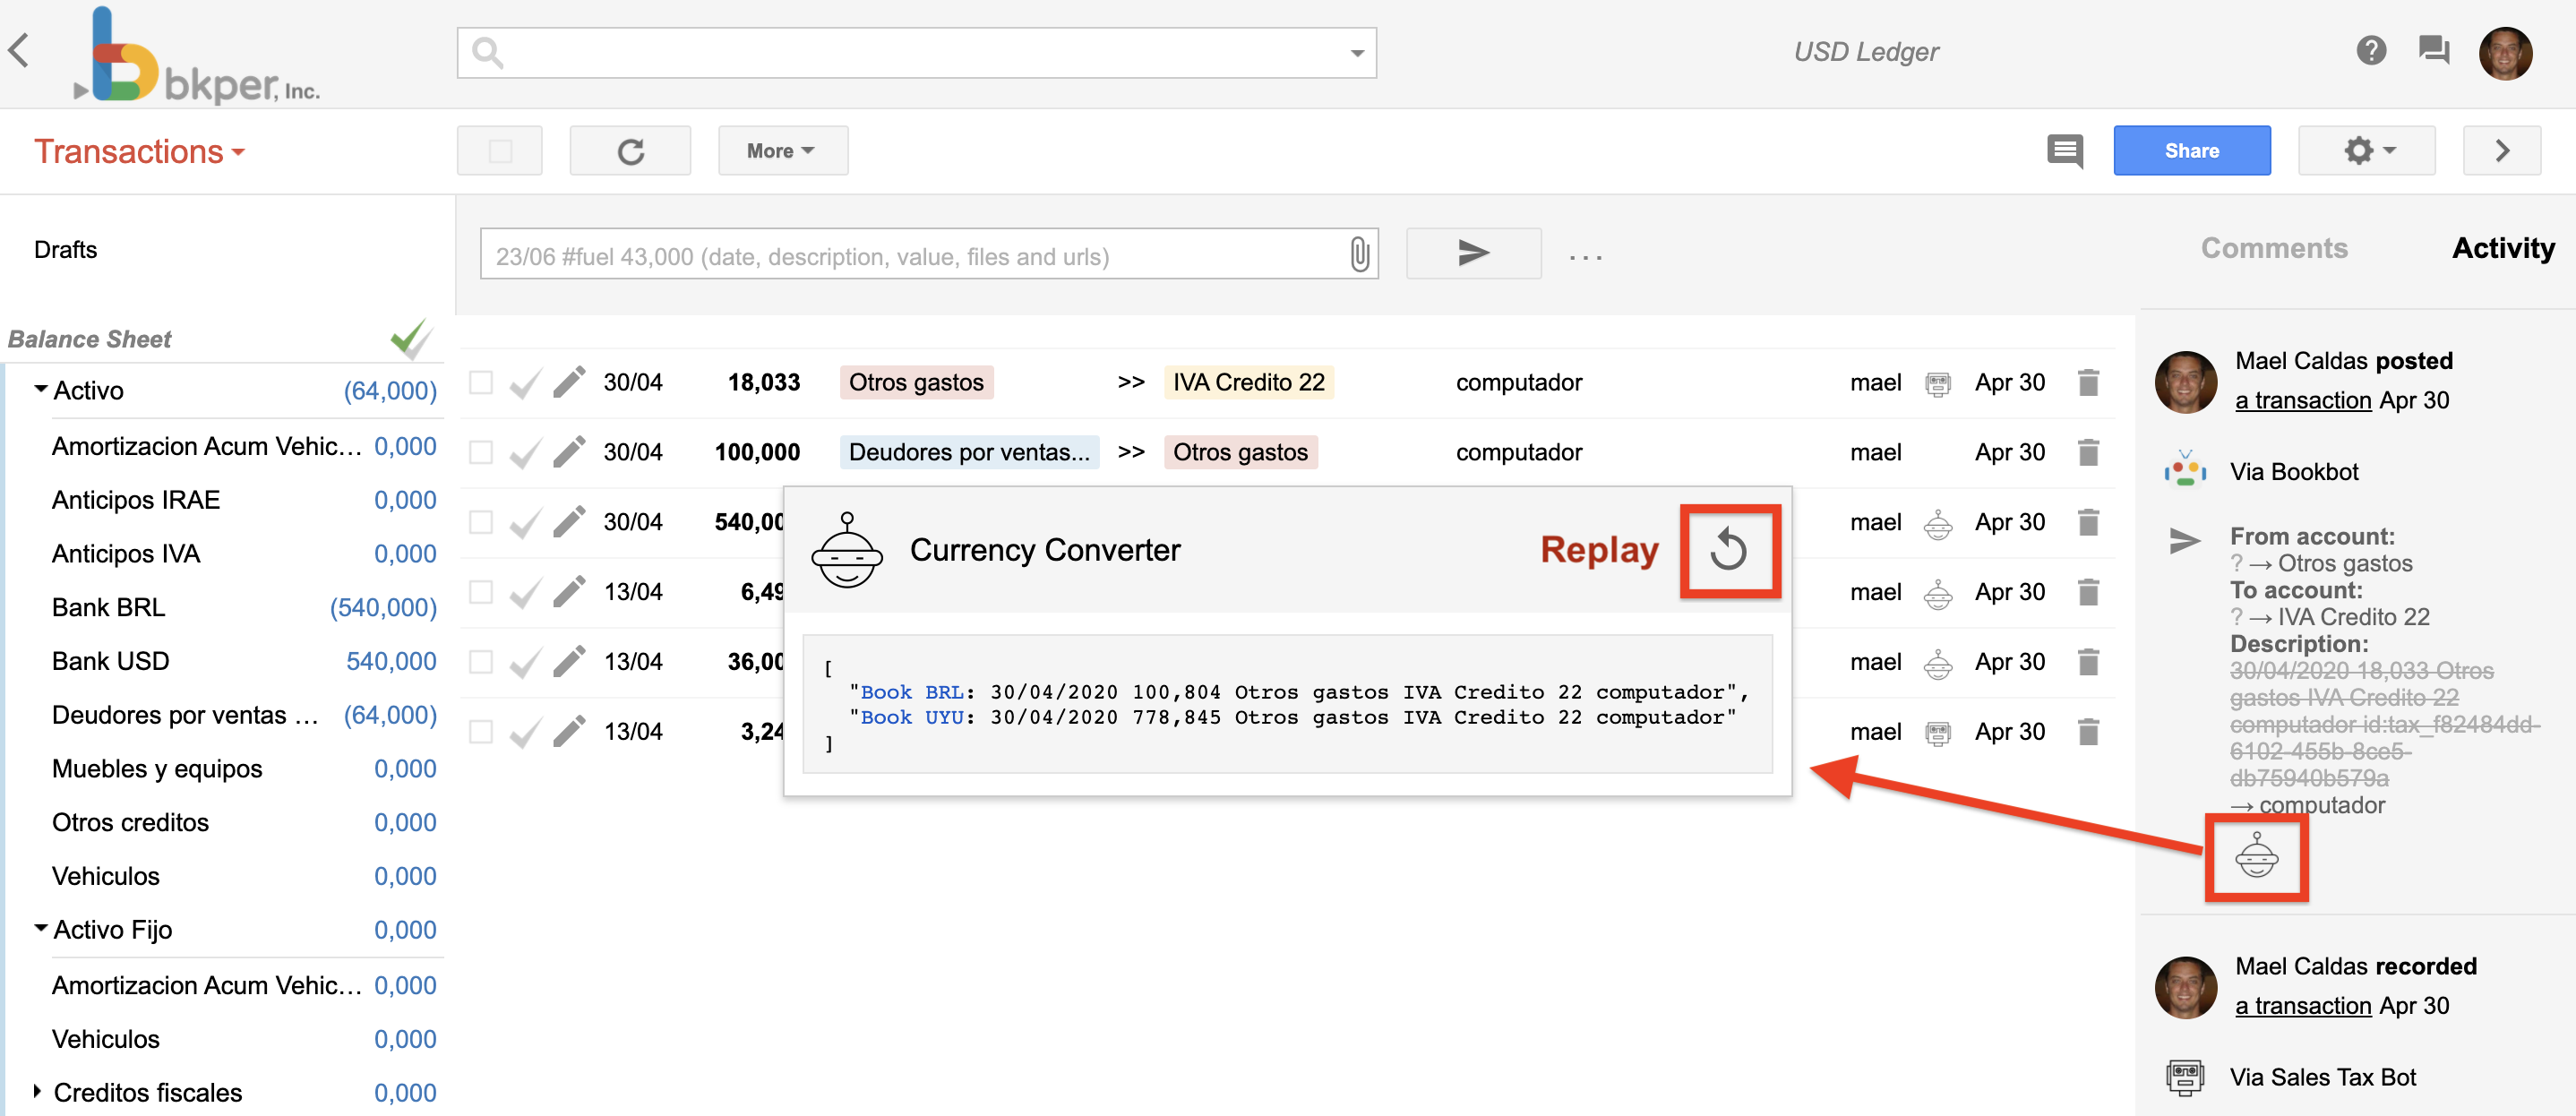
Bot responses
The bot responses are registered in the activity which started the bot call and can be viewed and replayed by clicking on the response at the bottom of the activity:
Cloud Functions Bot
A Bkper Bot running on Google Cloud Functions infrastructure, makes authenticated calls to the deployed function, as the bkper-hrd@appspot.gserviceaccount.com service account. In order to authenticate the service, you need to give the service account bkper-hrd@appspot.gserviceaccount.com the Cloud Functions Invoker IAM role (roles/cloudfunctions.invoker)
The production Cloud Function trigger is set at the webhookUrl property and the development endpoint at the webhookUrlDev, in the bkperapp.yaml file. E.g.
webhookUrl: https://us-central1-bkper-tax-agent.cloudfunctions.net/events
An OAuth Access Token of the user who installed the bot is sent to the webhookUrl production endpoint, and the API Key, in the bkper-oauth-token and bkper-api-key http headers, respectivelly, on each event, so the Bot can use both tokens to call the API back on behalf of the user.
The webhookUrlDev development endpoint does NOT receive those tokens, so the developer needs to perform the login locally and send the access_token accordingly. This can be simplified by the bkper-node utility library.
The function response payload must be in the format:
{result?: any, error?: any}
The result object is recorded on each book activity that generated the event as the bot response.
If the function returns a {result: false}, the bot response is suppressed and not recorded at the activity.
Any error returned, like {error: "This is an error"}, will show up as a Bot Response error, explained in the Development session.
To show up the full error stack trace, you can do like below:
  try {
    ...
  } catch (err) {
    res.send(response({error: err.stack ? err.stack.split("\n") : err}))
  }
That way the stacktrace will be pretty printed in the Bot Response.
The events throughput to the bot can sometimes be high, specially when processing large batches. You should set the max instance limit - usually 1-2 is enough - and the function will return a response code of 429 Too Many Requests, then the bot call will be automatically retried, with an incremental backoff logic, until receives an http 200.
Cloud Function Bots has a higher level of development complexity and the execution environment is subjected to Cloud Function Quotas. The quota counts agains the developer account, not the end user.
Its recommended for scenarios where the Bot event handling thoughput is even higher than 1 event/second/user and the logic can be handled asynchronously.
The Cloud Function Bots can be composed of context menus, built with Apps Script HTML Service, or any other infrastructure, to provide additional user interaction features.
Good cases are high throughput event handlers, like:
- The Tax Bot that provide tax calculations for transactions, supporting large batch imports.
- The Exchange Bot that handle big loads in paralell for calculating exchanges in multiple books, also providing a context menu UI for updating gains/losses due exchange variation.
- The Stock Bot that handle large amout of stock purchase/selling orders, also providing a context menu UI for calculating Realized Results using FIFO method.
Generic Webhook Bot
Cloud Function Bots are actually a recommended and proven way of handling book events in a high scalable and secure infrastructure, although you can build and host your bot in any other cloud infrastrucure, as well as on-premise.
To do so, you can use the same webhookUrl property and the development endpoint at the webhookUrlDev, in the bkperapp.yaml file.
The calls to the production webhook url is signed with a JWT token using Service to Function method. You can use this token to assert the identity of the Bkper service to ensure hight level of security. This is automatically done by the Cloud Functions infrastructure, so, we strongly recommend it.
The events throughput to the bot can sometimes be high, specially when processing large batches. If the bot infrastructure gets overloaded, you can return an http status 429 and the bot call will be automatically retried, with an incremental backoff logic, until receives an http 200.
Bot development
The Bot runs in Development Mode when executed by the developer or owner of the App.
Any succesfull result or error will be shown as the Bot response:
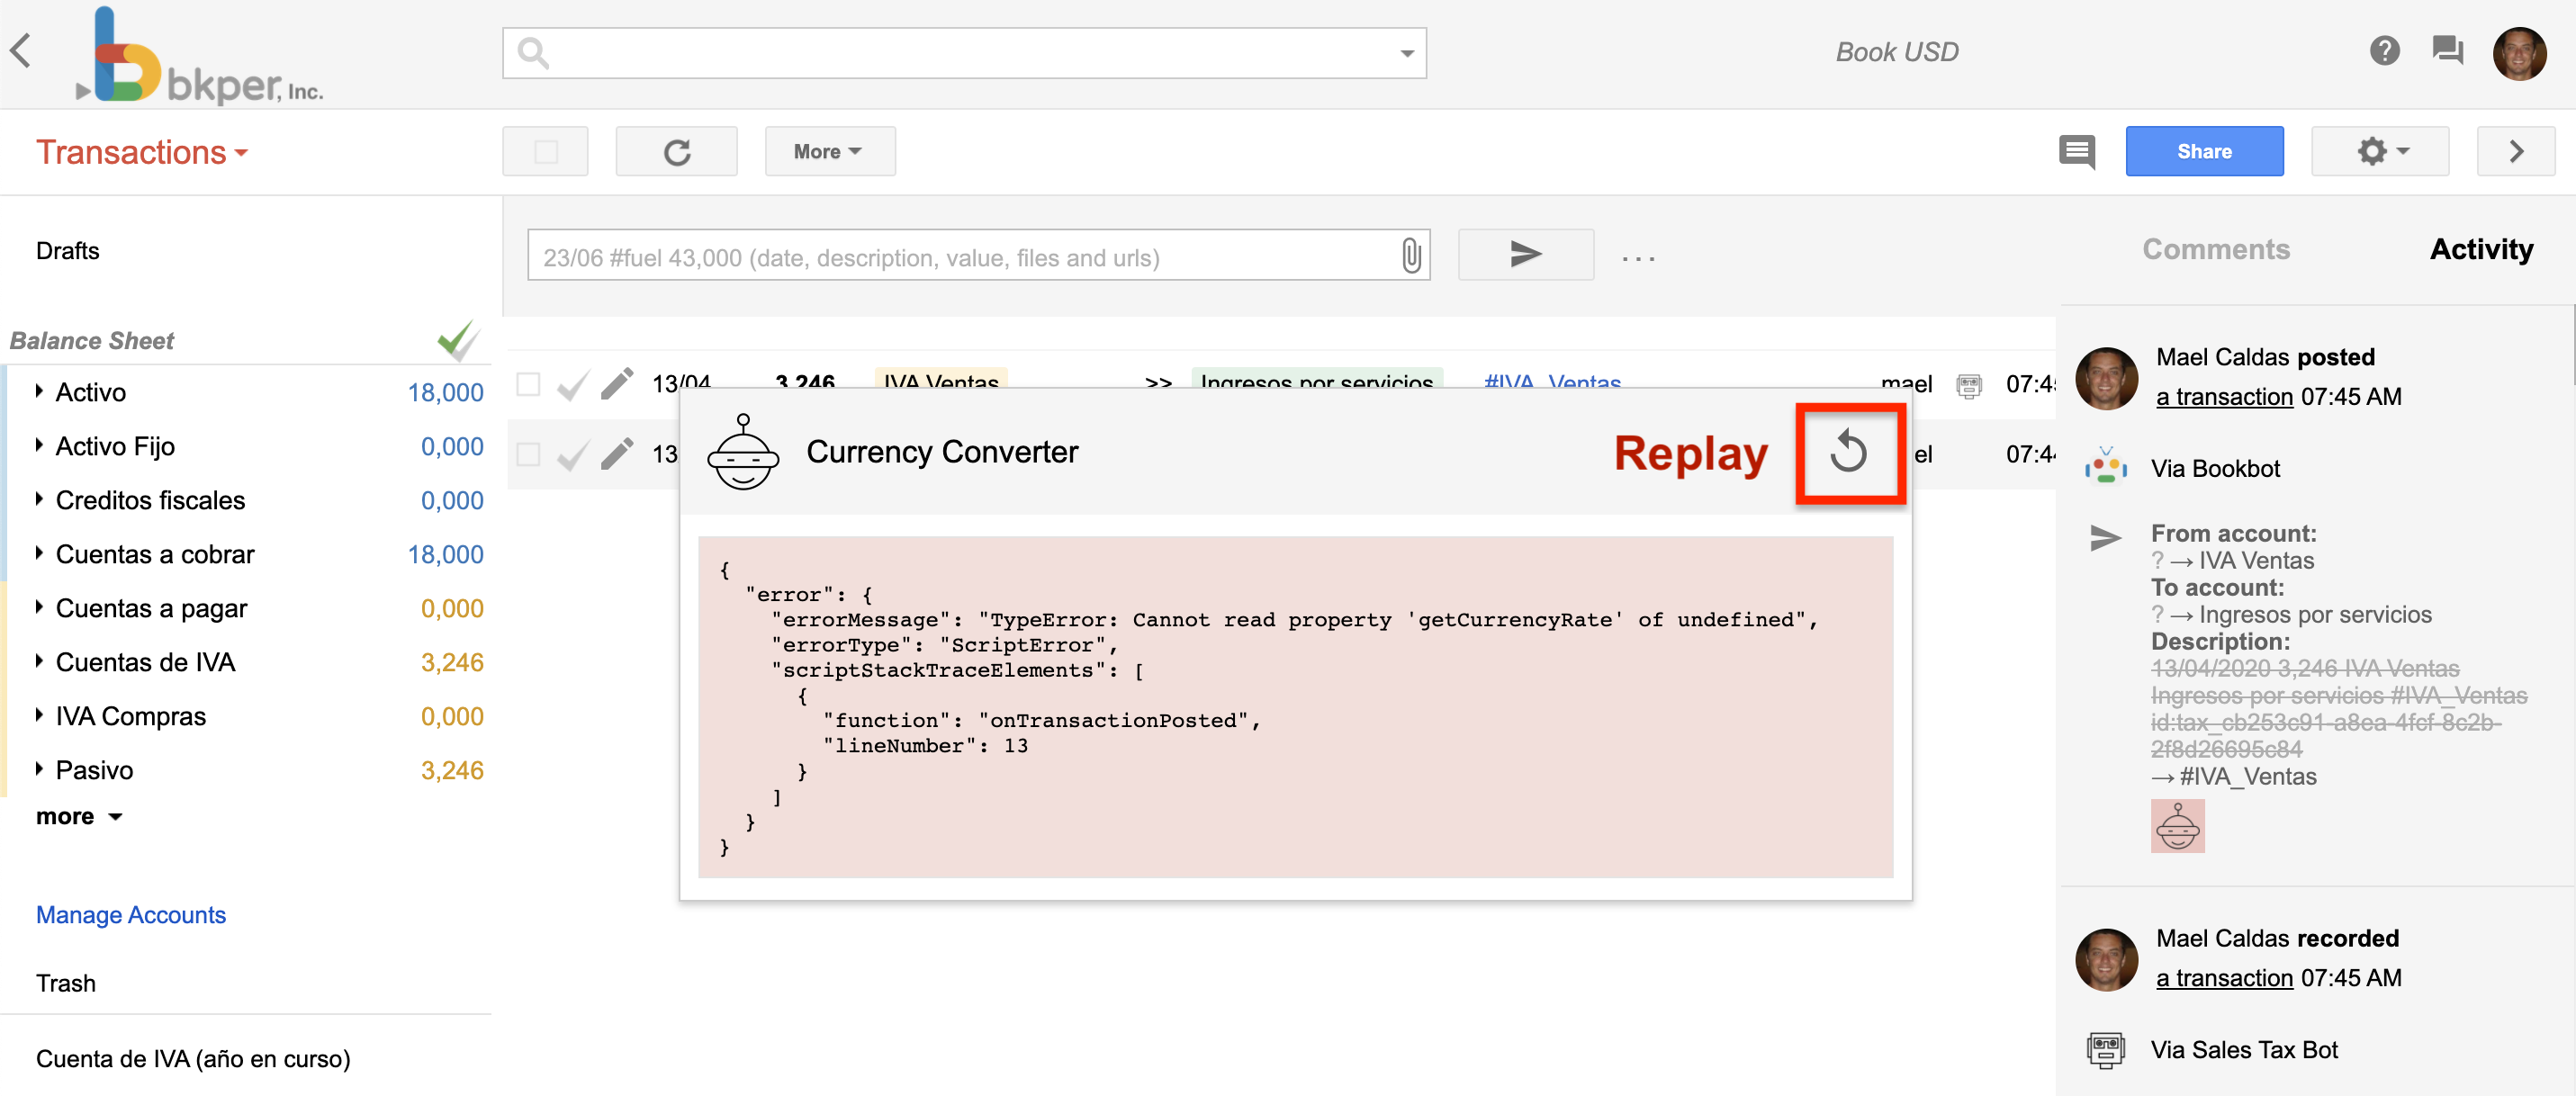
You can click the bot response to replay failed executions.
If you return an html snippet, with a link for example, it will be rendered in the response popup.
If you want to avoid recording the reponse, simply return false from your trigger function.
The Event object
When a bot subscript to an event type on events property of bkperapp.yaml, it receive an Event object in the following format:
    {
        /** The id of the Book associated to the Event */
        bookId?: string;

        /** The Book object associated with the Event */
        book?: {
            /**
             * The id of agent that created the resource
             */
            agentId?: string;

            collection?: Collection;
            /**
             * The creation timestamp, in milliseconds
             */
            createdAt?: string;
            /**
             * The date pattern of the Book. Example: dd/MM/yyyy
             */
            datePattern?: string;
            /**
             * The decimal separator of the Book
             */
            decimalSeparator?: "DOT" | "COMMA";
            /**
             * The number of fraction digits (decimal places) of the Book
             */
            fractionDigits?: number; // int32
            /**
             * The unique id that identifies the Book in the system. Found at bookId url param
             */
            id?: string;
            /**
             * The last update date of the Book, in in milliseconds
             */
            lastUpdateMs?: string;
            /**
             * The book lock date
             */
            lockDate?: string;
            /**
             * The name of the Book
             */
            name?: string;
            /**
             * The Book owner username
             */
            ownerName?: string;
            /**
             * The transactions pagination page size
             */
            pageSize?: number; // int32
            /**
             * The period slice for balances visualization
             */
            period?: "MONTH" | "QUARTER" | "YEAR";
            /**
             * The start month when YEAR period set
             */
            periodStartMonth?: "JANUARY" | "FEBRUARY" | "MARCH" | "APRIL" | "MAY" | "JUNE" | "JULY" | "AUGUST" | "SEPTEMBER" | "OCTOBER" | "NOVEMBER" | "DECEMBER";
            /**
             * The Permission the current user has in the Book
             */
            permission?: "OWNER" | "EDITOR" | "POSTER" | "RECORDER" | "VIEWER" | "NONE";
            /**
             * The key/value custom properties of the Book
             */
            properties?: {
                [name: string]: string;
            };
            /**
             * The time zone of the Book
             */
            timeZone?: string;
            /**
             * The time zone offset of the Book, in minutes
             */
            timeZoneOffset?: number; // int32
        };

        /** The user in charge of the Event */
        user?: {

            /** The user public avatar url */
            avatarUrl?: string;

            /** The user display name */
            name?: string;

            /** The Bkper username of the user */
            username?: string;
        };

        /** The Event agent, such as the App, Bot or Bank institution */
        agent?: {

            /** The agent id */
            id?: string;

            /** The agent logo. Public url or Base64 encoded */
            logo?: string;

            /** The agent name */
            name?: string;
        };

        /** The creation timestamp, in milliseconds */
        createdAt?: string;

        /** The event data */
        data?:{

            /**
             * The object payload. It will depend on the event type.
             *
             * For example, an ACCOUNT_CREATED type will receive an Account payload.
             */
            object?: Any;

            /** The object previous attributes when updated */
            previousAttributes?: {
                [name: string]: string;
            };
        };

        /** The unique id that identifies the Event */
        id?: string;

        /** The resource associated to the Event */
        resource?: string;

        /** The type of the Event */
        type?: "FILE_CREATED" | "TRANSACTION_CREATED" | "TRANSACTION_UPDATED" | "TRANSACTION_DELETED" | "TRANSACTION_POSTED" | "TRANSACTION_CHECKED" | "TRANSACTION_UNCHECKED" | "TRANSACTION_RESTORED" | "ACCOUNT_CREATED" | "ACCOUNT_UPDATED" | "ACCOUNT_DELETED" | "QUERY_CREATED" | "QUERY_UPDATED" | "QUERY_DELETED" | "GROUP_CREATED" | "GROUP_UPDATED" | "GROUP_DELETED" | "COMMENT_CREATED" | "COMMENT_DELETED" | "COLLABORATOR_ADDED" | "COLLABORATOR_UPDATED" | "COLLABORATOR_REMOVED" | "BOOK_UPDATED" | "BOOK_DELETED";
    }
The Event payload is the same exposed in the REST API and, if your are using Typescript, you can add the bkper-api-types package to your project and set the bkper.Event type to your request body, like bellow:
async function handleEvent(req: Request, res: Response) {
  let event: bkper.Event = req.body
}
Assistants
An Assistant is an agent that provides a prompt in the context of the books.
You build an Assistant the same way you build a Bot. In fact, they are usually an evolution of a Bot, but you can build an Assistant that does not respond to an event, thus not being a Bot.
To configure an Assistant, you add the conversationUrl endpoint to the bkperapp.yaml. E.g.
conversationUrl: https://us-central1-bkper-tax-agent.cloudfunctions.net/chat
As it happens with Bot, an OAuth Access Token of the user who installed the bot is sent to the conversationUrl production endpoint, and the API Key, in the bkper-oauth-token and bkper-api-key http headers, so the Assistant can use both tokens to call the API back on behalf of the user.
REST API
The Bkper REST API is the interface for Apps and Bots to interact with the Bkper Books having users securely authenticated under OAuth2 protocol.
Note: The REST API is the underlying connection interface behind the bkper-gs library.
The API is built on Swagger OpenAPI and Google API Discovery specifications:
You can use these specification documents to generate client libraries using open source tools such as OpenAPI generator or Google APIs code generator, in the language of your choice.
To call the API directly from the browser, you can use the discovery document with the gapi.
If you are using Typescript, we keep an updated type definitions package on npm you can easily add to your projects for autocomplete and contextual documentation:
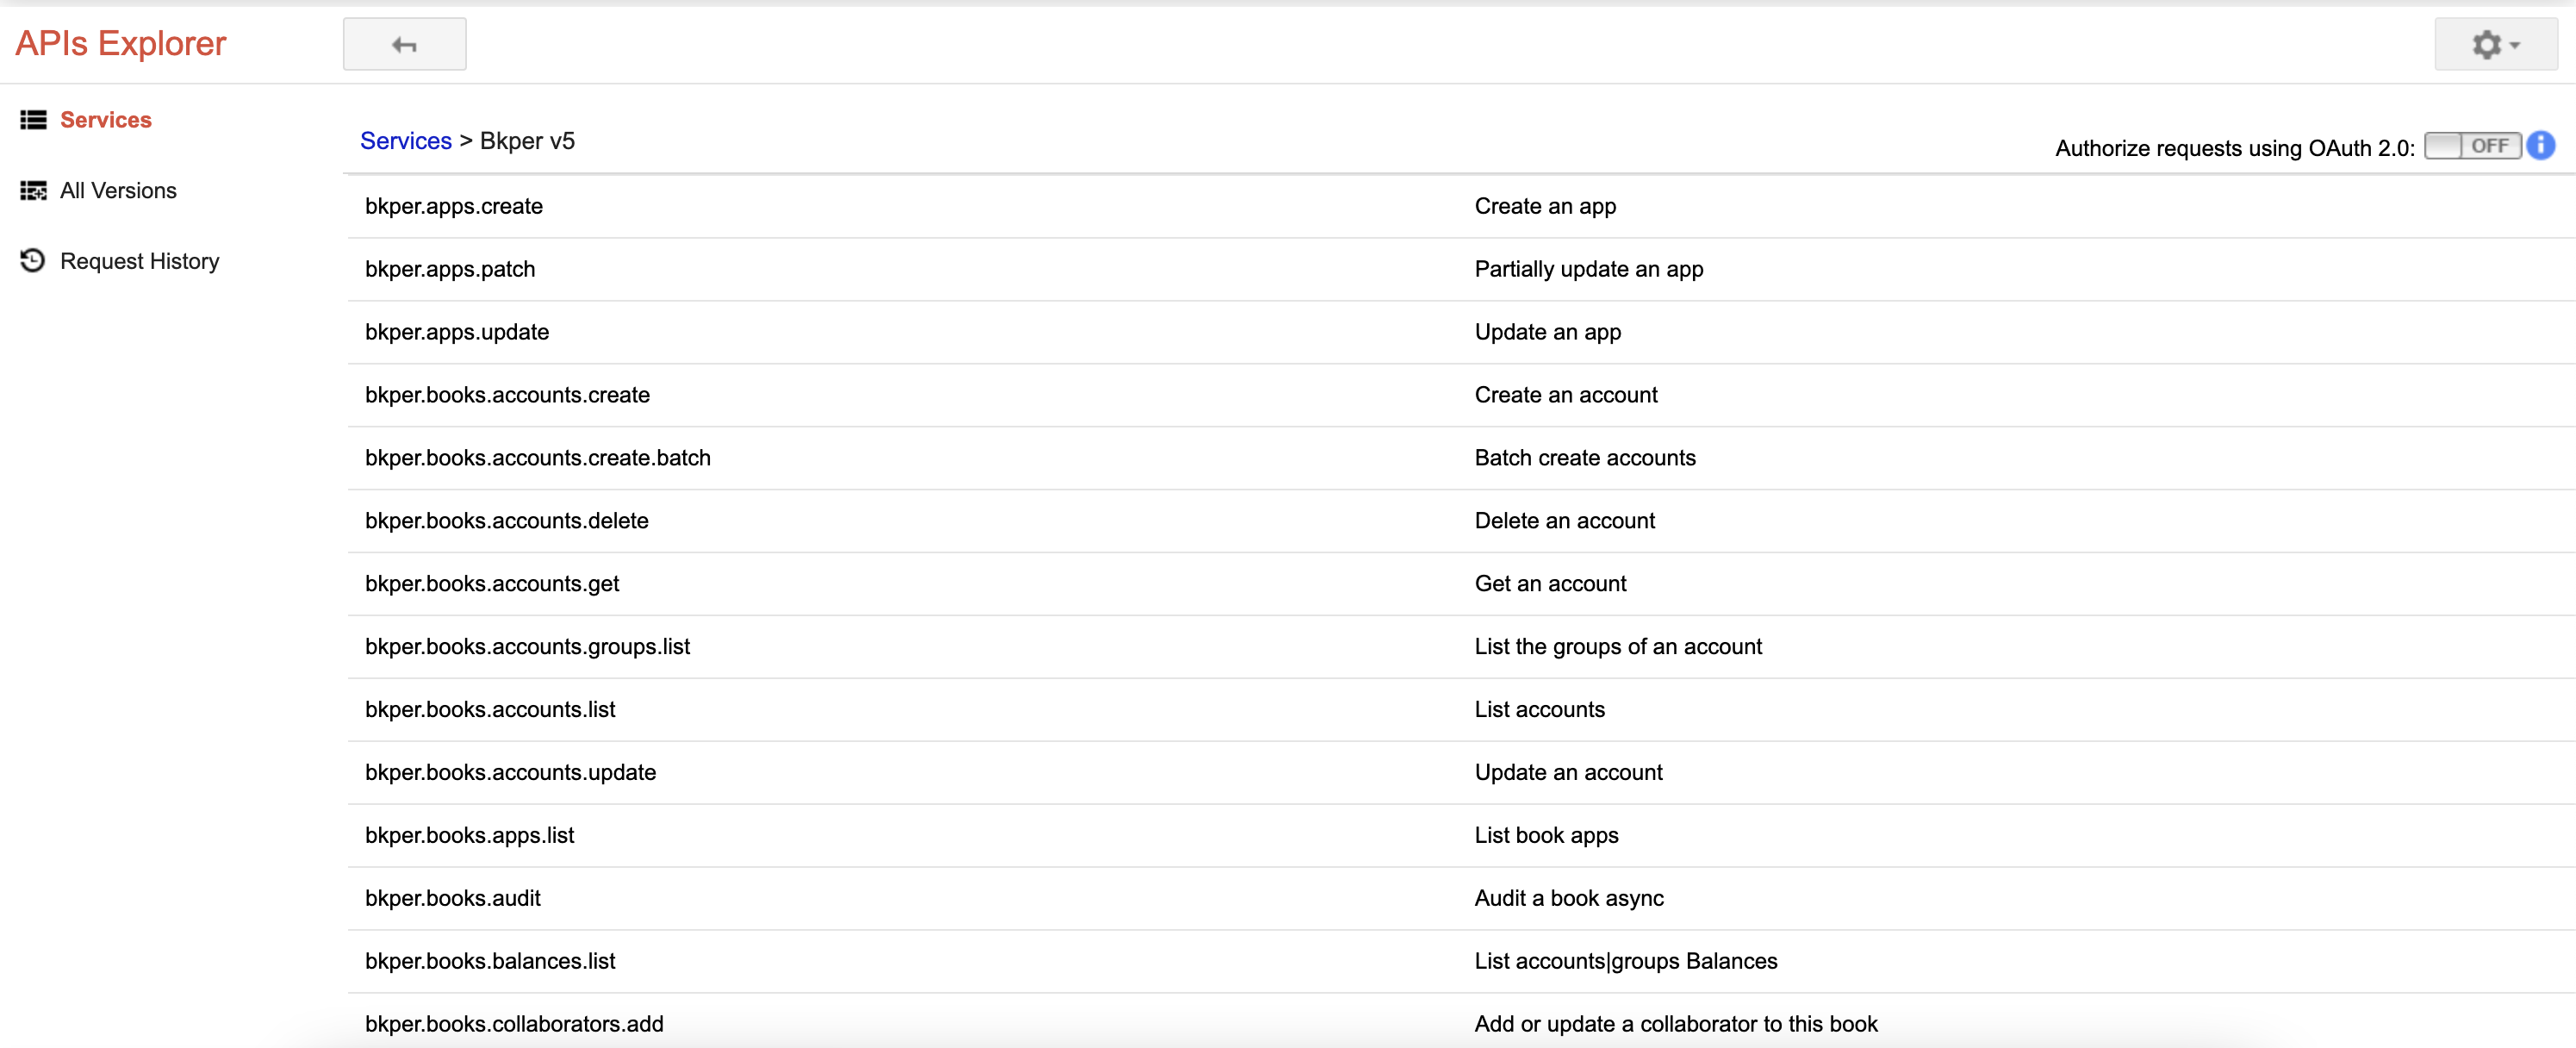
API Explorer
We provide a REST API Explorer at apis-explorer.appspot.com so you can check out the endpoints paths and payload formats, and try the API live:
Enabling the REST API
A Google Cloud Project project is required in order to use the Bkper REST API. Follow the steps to get started with the Bkper REST API:
- Join bkper@googlegroups.com to unlock the access to the API
- Create a new GCP project, or select an existing one.
- Enable the Bkper API in the Google Cloud Console.
- Create an API key
- Add API Restrictions to
app.bkper.comAPI only
- Add API Restrictions to
- Use this key=xxx as param on all API calls.
NOTE: Do not store the API Key on your code to avoid leaks, potentialy leading to quota theft. See securing an API key best practices.
For Google Apps Script, you can use the Script Properties. To store it, open the online editor,
File > Project properties > Script properties.
Authentication
The Bkper REST API uses OAuth 2.0 protocol with the email scope to authenticate users.
You should send a valid OAuth2 Bearer token in the Authentication header of the API http requests.
More details below:
Authentication for Server-side Web Apps
Authentication for JavaScript Web Apps
Authentication for Mobile and Desktop Apps
Server side Google Apps Script example
For Google Apps Script you can use the built in ScriptApp.getOAuthToken() in your code to access the OAuth2 access token the script has acquired and pass it in the Authorization header of a UrlFetchApp.fetch() call, like bellow:
function listBooks() {
  var options = {
    headers: {
       Authorization: 'Bearer ' + ScriptApp.getOAuthToken()
     }
  };
  Session.getActiveUser().getEmail() // Ensure email scope used
  var url = 'https://app.bkper.com/_ah/api/bkper/v4/books?key=' + PropertiesService.getScriptProperties().getProperty('API_KEY'); // Store the key on File > Project properties > Script properties
  var content = UrlFetchApp.fetch(url, options).getContentText();
  Logger.log(content)
}
The ScriptApp.getOAuthToken() should work on most cases, but, if you work on some restricted environment, such as Google Sheets custom functions, you can manage the tokens with the OAuth2 for Apps Script library. See the bkper-sheets Authorizer for a detailed example.
Client side javascript example
For client side javascript, you should configure the OAuth consent screen and use the google-api-javascript-client initializing with our discovery document, your API key, Client ID and the email scope, like bellow:
<html>
  <head>
    <script src="https://apis.google.com/js/api.js"></script>
    <script>
      function start() {
        // Initializes the client with the API key and the Bkper API.
        gapi.client.init({
          discoveryDocs: ['https://app.bkper.com/_ah/api/discovery/v1/apis/bkper/v5/rest'],
          apiKey: 'YOUR_API_KEY',
          clientId: 'YOUR_CLIENT_ID',
          scope:'email'
        }).then(function() {
          // Executes an API request, and returns a Promise.
          // The method name `bkper.books.list` comes from the API discovery.
          return gapi.client.bkper.books.list();
        }).then(function(response) {
          var books = response.result.items;
          document.getElementById('results').innerText = JSON.stringify(books, null, 4);
        }, function(reason) {
          console.log('Error: ' + reason.result);
        });
      };
      // Loads the JavaScript client library and invokes `start` afterwards.
      gapi.load('client', start);
    </script>
  </head>
  <body>
    <div id="results"></div>
  </body>
</html>
NOTE: Don’t forget to restrict your key only to http referrers your project will run
Metrics
Once you enable and start using the API, you can check out detailed metrics on the GCP Console, of the API calls for your project:
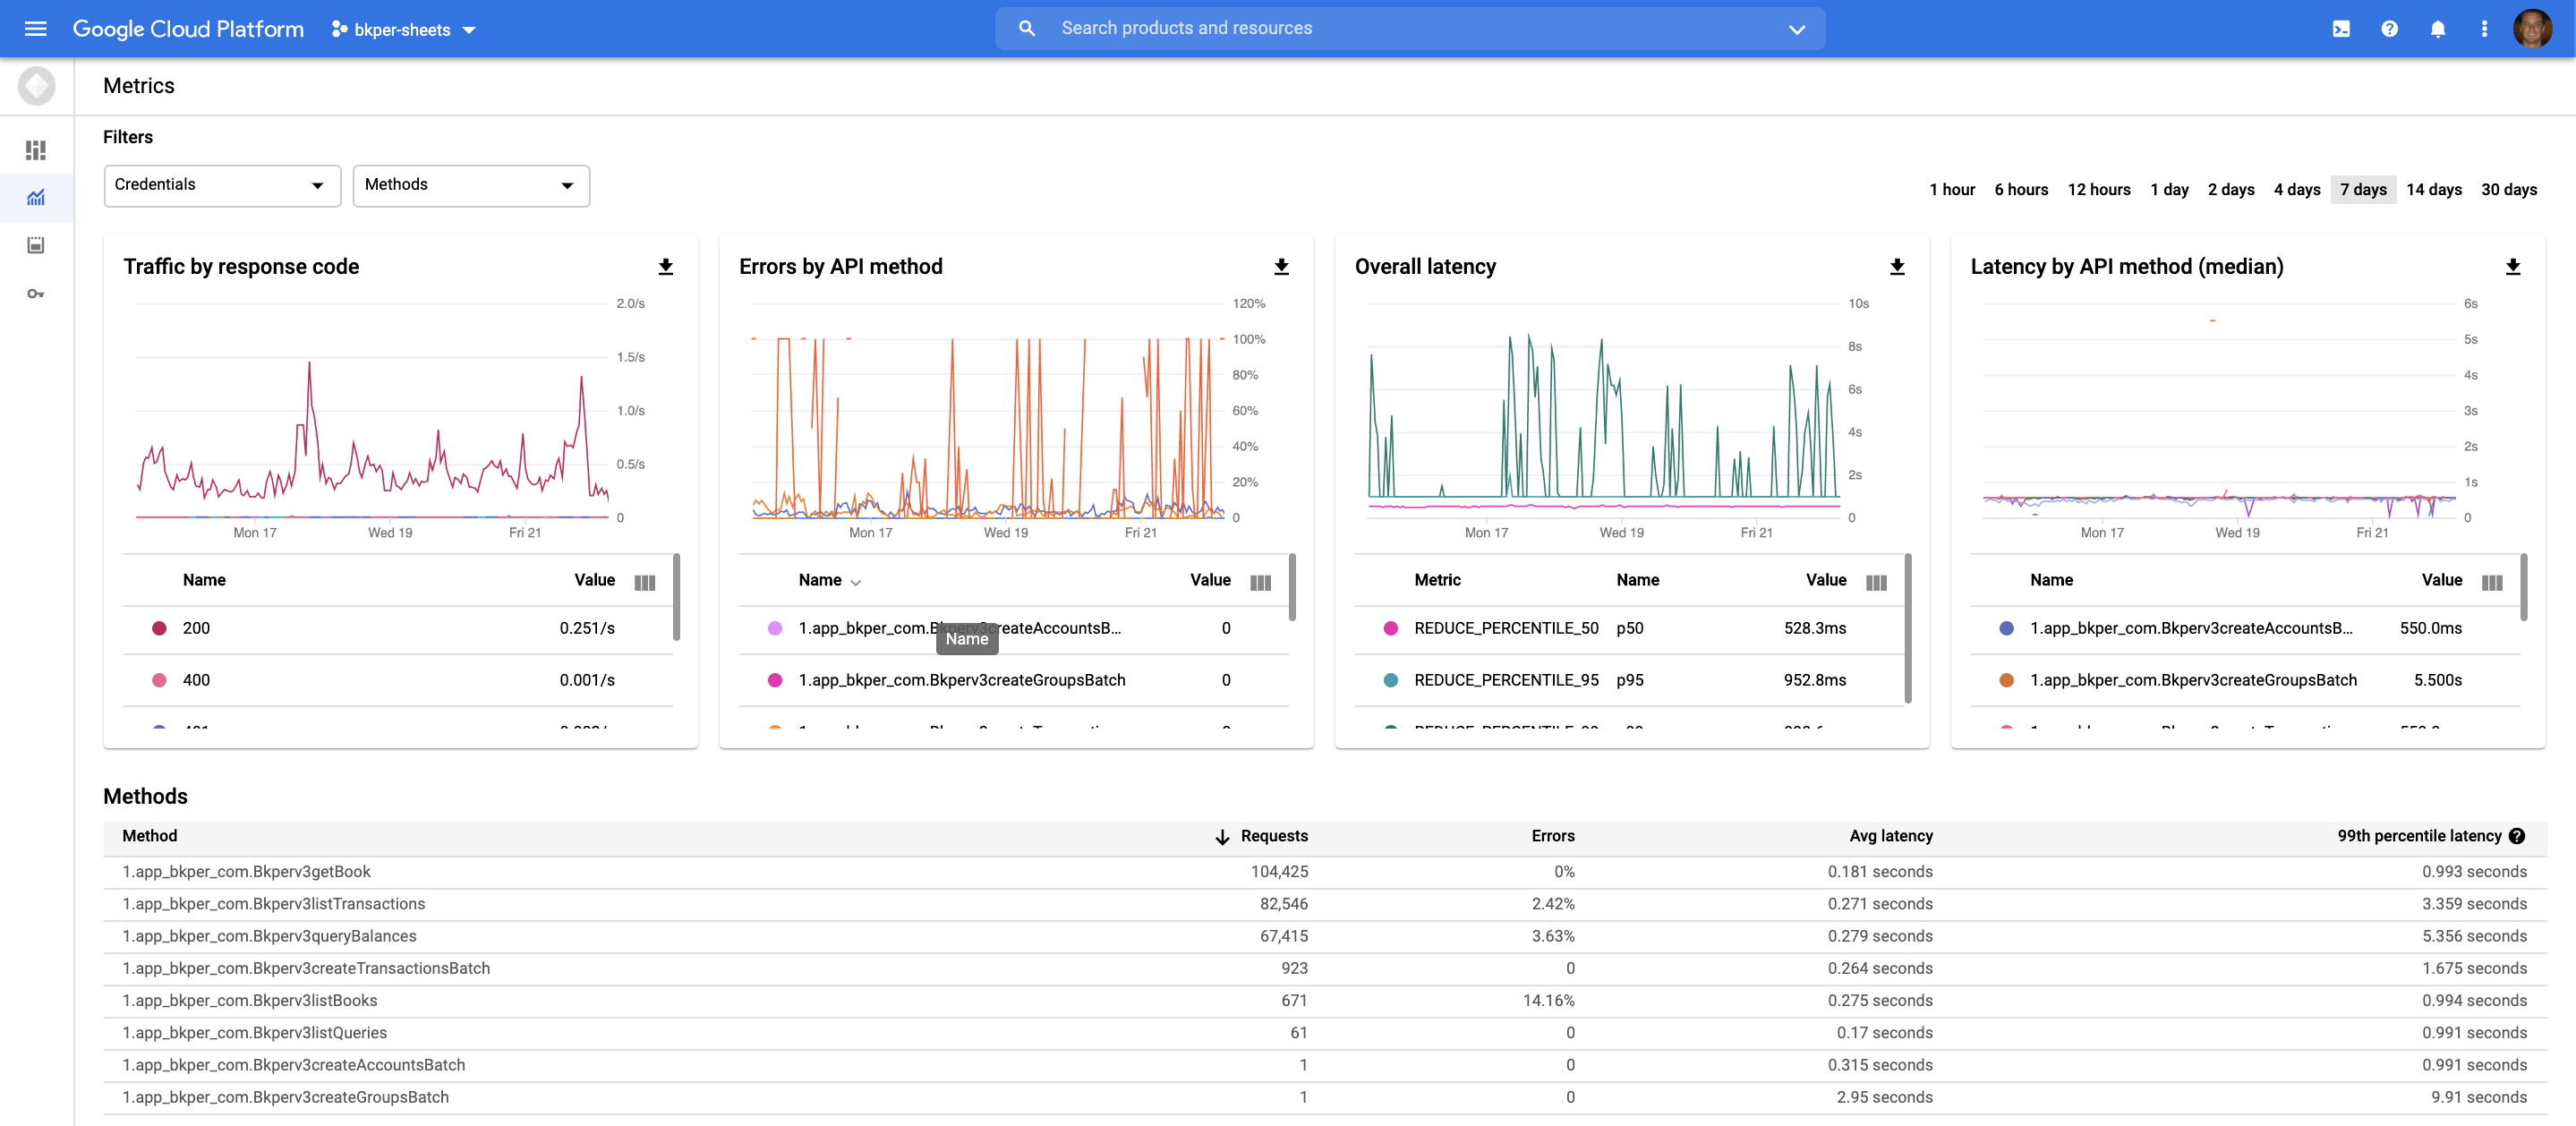
The metrics dashboard provides you with information about endpoint calls, latency and errors, giving a good overview of the project integration health.
Quota
The quotas dashboard provides details of the current default and quota exceeded errors.
The current default quota 180 requests per minute, per project. If you need to increase the quota, please get in touch so we discuss your case.
Examples
Bkper CSV App - Import/Export transactions in CSV format.
Tax Bot - Bot to calculate VAT, GST and taxes based on the transaction amount.
Exchange Bot - Bot to convert transaction amounts between Books based on updated exchange rates and calculate gains & losses.
Stock Bot - Bot to keep stocks/bonds instruments book in sync with financial books a calculate realized results in FIFO method.
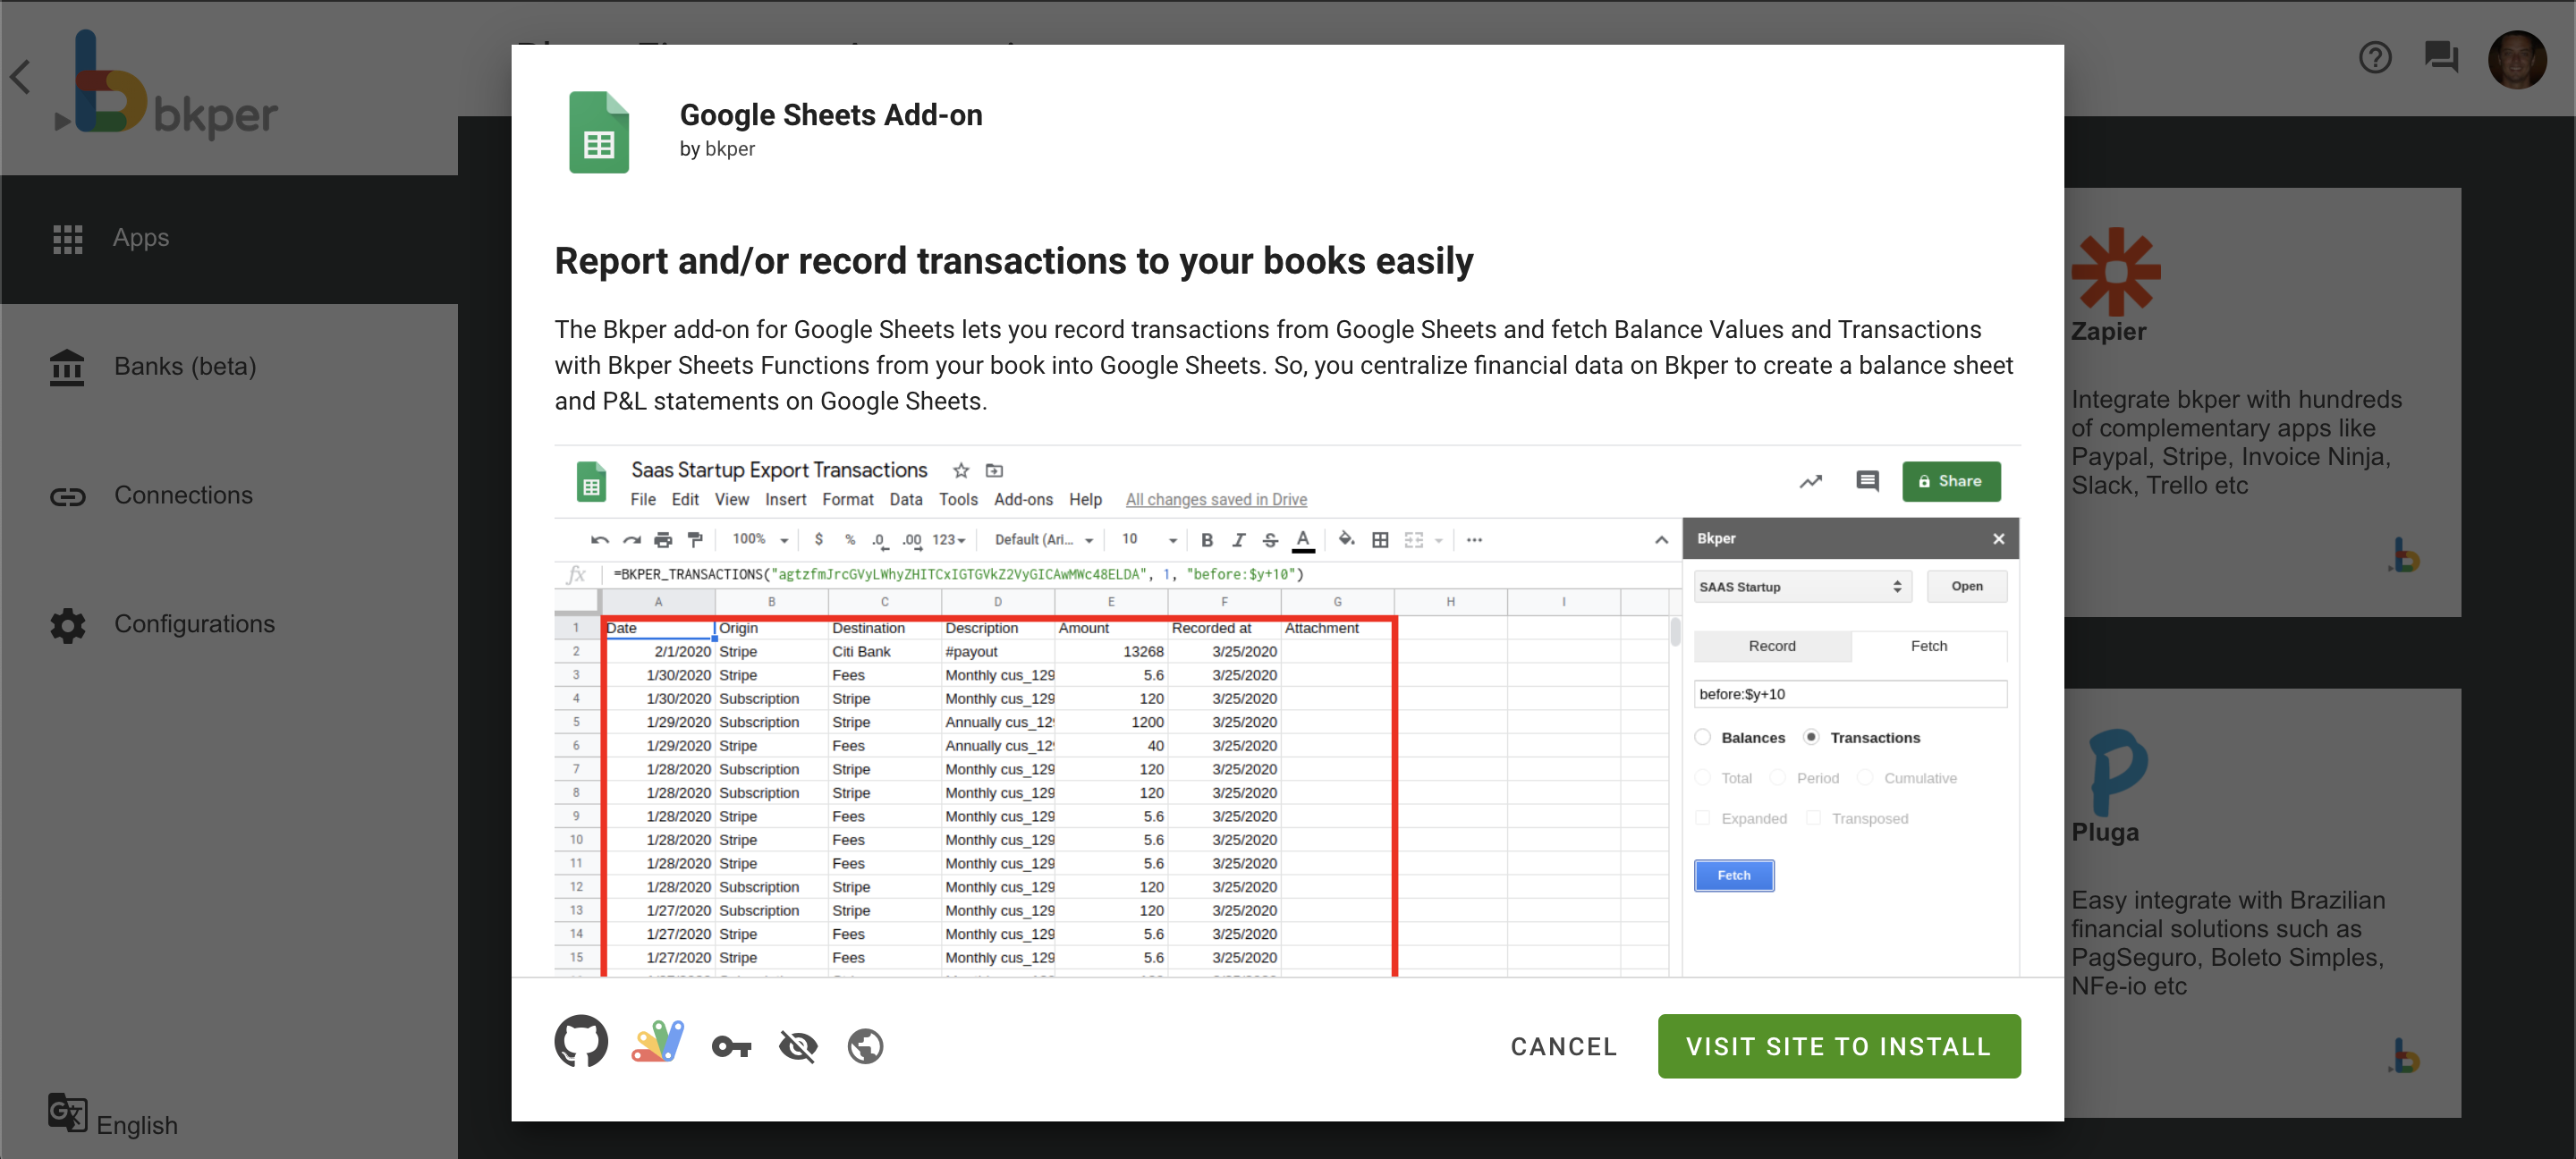
Bkper Add-on for Google Sheets - Google Sheets Add-on to extend Bkper features, import/export data and run custom formulas from within your Spreadsheets.
Altough you can work on the Online editor really quickly, we strongly recommend clasp to develop locally with Typescript on VS Code editor, which is really powerfull and free, so you get:
- Code Autocomplete
- Contextual documentation
- Compile time error checking
- Code navigation - really helpful!
- Calling hierarchy searching
- Use of new javascript features such as classes, interfaces, arrow functions etc
- Easier code redability
- Automatic refactoring
Utilities
Those are some utilities we use to build our own Apps and Bots. It’s a set of well tested and documented libraries you can use on your own projects:
-
bkper-js - The javascript client library we use to simplify the access to the Bkper REST API in the Node.js and Browser environments.
-
bkper-gs - The Google Apps Script library to access the Bkper REST API in a secure and simple way.
-
bkper-node - The Node.js command line tool we use to help manage Apps and Bots
Publishing
By default, the App or Bot you create is visible only for you or your company, in case of Google Workspace domains.
If you are interested in publishing your App or Bot to all users, please contact us at support@bkper.com